Showing posts with label bread. Show all posts

Wednesday, March 2, 2011

Mom's Overnight Wheat Rolls

One of the best things about having your mom for a neighbor is fresh, warm, and straight from the oven. My mother is a fellow recipe-tinkerer and her process is as enlightening as it is delicious. If Mom makes something pretty good, she'll call and tell me to come have a taste. If she makes something really good, she'll tell me to come have a taste and bring my camera. When she hits the magic note just right, she'll walk down to my house. These rolls, at some point during the process, have merited all of the above, including the triumphal victory march to my home. The recipe for Mom's Overnight Wheat Rolls is now pitch perfect. With a pat of sweet butter, warm and melting, you'll be singing their praises. But don't eat them all; a midnight snack with a slice of ham and a dab of honey butter will put you to bed better than a baby's lullaby. If these rolls were music, then they just won a grammy. For my mammy.
Mom's Overnight Wheat Rolls
Estimated Cost: $1.00
Money Saving Tips: Make up a double or a triple batch and freeze them after baking. It saves oven energy and money.
1 and 1/2 cups room temperature water
1 and 1/2 teaspoons active dry yeast
1 tablespoon sugar
1 teaspoon salt
1 tablespoon dried minced onion
1 and 1/2 cups wheat flour
1 and 1/2 cups all purpose flour, plus more for shaping
Mix all ingredients with a wooden spoon to combine. Cover with plastic wrap and refrigerate overnight. An hour before ready to bake, take dough out of the refrigerator. Let rest for one hour. Preheat oven to 425 degrees. On a floured surface, pat dough into rectangle. Roll into cylinder. Cut into 9 rolls. Place in greased nine inch baking dish. Let rise, covered for twenty minutes. Bake for about 20 minutes, or until tops and bottoms are golden brown. Let rest for one minute and remove from pan.
Next Up:
Pasta Amatriciana

Thursday, January 20, 2011

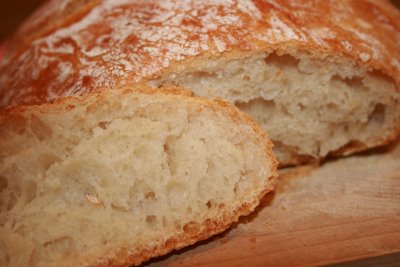
Sullivan's Homemade Crusty Bread-with a shortcut

Post Edit: Thanks to Shanzanne for pointing out that the name of the bread creator is Jim Lahey of Sullivan Street Bakery. Forgive the error. I promise to keep making mistakes just as long as you will keep forgiving them.
I am pretty certain at this point that most people have tried the famous no-knead bread. I have and I'm a believer. Sullivan Bakery master Jim Lahey believed that the ancient Romans probably weren't setting a timer for 8 minutes to knead their bread erstwhile eeking out a living and guarding their homes against invading Barbarians. No, more likely than not, they were mixing up some very basic and standard ingredients and leaving the mass to fend for itself for the day. Sullivan mixed up some flour, water, and salt and found that with a very small amount of yeast and an ample amount of time, he could produce some exemplary loaves of bread. The other issue, of course, is capturing the crustiness produced by the blazing hot temperatures of the old wood fired ovens. Lahey found that if you preheat a pot and lid in your oven at 450 degrees for 30 minutes, you could slip in your dough and produce roughly the same effect. It works. The bread is crusty and full of beautiful holes. It was grand.... Except I have to confess that it really bothered me to have my oven on for 30 minutes with nothing inside of it. It's an apalling waste of energy and money. I started skipping the 30 minute hellfire and began putting my pot in the oven for as long as it took for the oven to preheat to 450 degrees. I felt a little better. But wait; it gets better still. A while back, Lahey found that he could produce the same great results by popping his bread into the cold pot and skipping the preheat all together. The first time I tried it, my bread was stubbornly plastered to the bottom of the pan. The next time, I coated my pot with a slick of vegetable oil and the problem was solved.
Here's what you're going to do. Roughly 24 hours before you want to eat bread, mix up 3 cups flour, 1/4 teaspoon yeast (If you're kitchen isn't at least 70 degrees, use 1/2 teaspoon yeast), 1 and 1/4 teaspoon salt and 1 and 7/8 cups water. Stir it together just until you have a shaggy mess. Cover it with plastic wrap and let it sit for somewhere between 12 and 18 hours.

Get a little flour on your hands. Take the dough out of the bowl and knead it for a few seconds until it comes together in a smooth ball. I used to take the smooth ball and put it on a floured dishcloth to let it rise for two additional hours. Now, I oil the bottom of an oven-safe cooking pot and dust it with cornmeal and put the bread in there to rise.Here's a picture of my pot when I used to preheat. You could use a Dutch Oven, or a glass casserole dish. I use my regular old stock pot, but I cover the handles with tinfoil, since the handles aren't ovenproof.
If you're using the shortcut method, you won't have to worry about the preheat. In fact, Jim says you can even skip the second two hour rise. I tried it once, but I had better results with a second rise in the cold pot for two hours. Place the cold pot with your bread inside, covered with a lid, in the oven and turn the oven on to 450 degrees. Bake for 30 minutes. Remove the lid and bake an additional 30 minutes. Here's what's waiting for you. Ta-da. You're not supposed to slice into it until it cools. I can never last that long. I bet the ancient Romans didn't resist, either. Sullivan's Homemade Crusty Bread-the shortcut
Cost: less than $1 a loaf
3 cups flour, plus more for dusting
1/4 teaspoon yeast (double it if your kitchen is colder than 70 degrees)
1 and 7/8 cup water
1 and 1/4 teaspoons salt
cornmeal for dusting
Stir together flour, yeast and salt. Add water and stir until shaggy and combined. Cover with plastic wrap and let rise for 12-18 hours. Coat hands with flour and shape dough into ball. Place in pot with lid. (I grease the bottom of my pot.) Let rise for two more hours. Place bread in pot, covered with lid, in the oven and turn the oven to 450 degrees. Bake for 30 minutes. Remove the lid and bake an additional 30 minutes.
PS Thanks everybody for all of your Tiger Mother input on the last post. I'm still thinking about it and your comments were very insightful.

Friday, November 12, 2010

Pumpkin Chocolate Chip Bread

My little sister just informed that I have not yet posted my pumpkin chocolate chip bread. Her apron was on and she was ready to bake. Where was the recipe? Of course she must be mistaken! I churn out loaves of this perfect pumpkin bread every year. Here's why it's perfect: The recipe uses the entire can of pumpkin (waste not, want not), has just the right combination of pumpkin flavor, cinnamon, and chocolate, uses common, inexpensive ingredients and is a snap to make. The end result is three delicious loaves for sharing with neighbors and friends. Of course I must have posted it already! Right???? Right?
Wrong. I even took a picture last year, but never posted the recipe. So here it is, better late than never. Thanks for the reminder, sistuh. You've given me a good idea of what to do with the rest of my afternoon.
Pumpkin Chocolate Chip Bread
Estimated Cost: $4.00 for threestandard loaves, or 8 mini loaves
Notes: You can swap out the nuts for an equal amount of extra chocolate chips.
1 (15 ounce) can solid pack pumpkin
1 cup vegetable oil
3 cups sugar
2/3 cup water
4 eggs
1 teaspoon cinnamon
2 teaspoons baking soda
1 and 1/2 teaspoons salt
3 and 1/2 cups flour
1 cup chopped walnuts
1 cup chocolate chips tossed with 2 tablespoons flour
Preheat oven to 350 degrees. Grease 3 standard loaf pans. In a large bowl, combine pumpkin, oil, sugar, water and eggs, mixing well. Add in cinnamon, soda and salt. Very gently, stir in flour until just combined. Stir in walnuts and chocolate chips. Separate into 3 separate loaf pans. Bake for one hour, or until a toothpick inserted into the center comes out clean. Let cool on a rack for ten minutes before removing from pan.
Next Up: Mini Freeform Meatloaves

Thursday, October 7, 2010

Buttery Crescent Rolls

The fall weather finally made its way here. We had wild lightening and thunder storms and three days of intermittent rain. I think sometimes I forget how dangerous lightening can be. I'm so dazzled by its beauty, by the coziness inside the house caused by storms outside. I was reminded this week that they are spectacularly perilous. The kids and I had twice put on all our raingear to go for a midday puddle stomp, but when we got outside the thunder pounded around us, forcing us back inside. West begged to be let out of the house. He just wanted to walk across the street to Grandma and Grandpa's, for Pete's sake. But I held my ground. I was using the old watch the lightening-count till thunder trick, and determined that the storms were too close to risk it. About that same time.... sadly, just a few miles up the road, two 17 year old boys from my community were struck by lightening as they waited (just four feet) outside of the high school for a ride home. Both are expected to survive, thanks to other saavy high school students who jumped in to render CPR. The families are requesting prayers for their boys, so please keep them in yours. It's a good reminder to hunker down and stay inside when there are electrical storms outside.
O.K.-I've got something cheerier to share today: my recipe for buttery crescent rolls. They're perfect for days when you've got to be inside for a few hours. They aren't difficult to mix together, but you've got to be around for rising and baking times. The end result is buttery, flaky rolls that your family will love. Stay safe and Happy Fall Baking!
Money Saving Tips: While you've got the oven on, you might as well bake up a double or trip batch and freeze them for later. You'll save on time and energy-which means money.
Buttery Crescent Rolls
Estimated Cost: $1.50 for a two dozen
4 and 1/2 teaspoons active dry yeast
3/4 cup warm water
1/2 cup sugar
6 tablespoons butter, plus 2 tablespoons, softened, divided
2 eggs
1 teaspoon salt
4 and 1/2 cups flour
Dissolve yeast in water. Add sugar, 6 tablespoons butter, eggs, salt and 2 cups flour. Beat until smooth. Stir in remaining flour. Turn onto surface and knead for 6-8 minutes, or use free standing mixer for about five minutes on medium. Place in a greased bowl and let rise until doubled, about 75 minutes. Gently punch down the dough and divide in half. Roll each half into 12 inch circle. Spread with one tablespoon butter and cut each circle into into 12 wedges, Roll up wedges and tuck under. Place on greased cookie sheets. Cover and let rise until doubled, about forty five minutes. Bake in preheated 375 degree oven for 8-10 minutes or until golden brown. Let cool on racks. (To freeze, cool completely, wrap tightly and freeze. You can freeze them before or after baking.)
Next Up:
Italian Tomato and Basil Crock Pot Steaks

Monday, June 21, 2010

Cinnamon Swirl Bread

We had such a funtabulous weekend. I was really expecting it to be rather quiet, since we're having a rare lull between summer visitors. Usually we catch up on work and chores, balance checkbooks and weed gardens, and other unpleasantries when we are without guests. This weekend, we chucked all the mundane stuff out the window, and just had a great time. On Friday night, we went to a late showing of Toy Story 3. I love the excitement and anticipation of late night shows on opening day. We liked Toy Story 3 so much that we didn't even finish our bucket of popcorn-and that's saying alot for my snacky family. This groovy tiger stole the show. Hiya, Kennie. I never had Ken or any Barbies, but my friend Julie L. used to pack a giant suitcase full of boy and girl Barbies when she came for a sleepover. We had a great time UNTIL I accidentally dropped her Barbie furcoat in her Barbie pool. That was the end of that. Sorry, Julie L. But the movie was marvelous, and I can recommend it without reservation for kids from 1 to 92.

On Saturday,the kids had a lemonade stand and brought in a cool ten dollars. Sailor claims she did most of the work and should probably get more than half of the ten, since West mostly just ran around with neighborhood boys, putting ice cubes down each other's shirts. It's hard to be an ant when your little brother is a grasshopper.
We swam in the afternoon, rode bikes around the neighborhood, and then built a fire in the backyard and roasted hot dogs and marshmallows. You might as well set up a tent and play Uno, if you're going to pretend to camp. This tent it 26 years old and smells like the Scout Jamboree, but that kind of thing doesn't bother you until you hit middle age, I think. But it is a good place to hide and wrap Father's Day gifts. Father's Day is a feasting day- I made a grilled steak with a maple chili butter that is pure heaven, but that's another post for another day. The Quiet Man ate well, opened gifts, and had a nap and the charges only got in 12.6 arguments, instead of their usual 32.9, in honor of Dad's special day. What more could a father want? How about cinnamon swirl bread?
Well, whaddya know, we've got some right here. This yummy swirled bread was my Tuesdays with Dorie assignment last week, so you've got to click here to get the recipe. I left out the raisins, since my kids act like they might be poisonous. It was delicious fresh and hot out of the oven, but even better as toast. And even even even better as cinnamon toast.
Hope you had a wonderful weekend and Father's Day.
Next Up:
June Bug:Non Alcoholic Fun Fizzy Drinks

Thursday, June 18, 2009

Cheddar Cheese Bread

At this very moment:
The Quiet Man is night fishing for sea bass with his brothers on Madaket Beach.
The girl cousins are tucked into sleeping bags watching "I love Lucy" and waiting for buttered popcorn.
The boy cousins are playing cops and robbers on the lawn with Nerf guns, with a little bit of wrestling and kick boxing thrown in for good measure.
I'm finishing up my fourth novel of the trip( a Poe biography, Morgan's Crossing, Breathing Lessons, and now Hurry Down Sunshine, plus I'm reading Johnny Tremain out loud to the charges) and wearing my new aqua blue Nantucket T-shirt that I found in a bargain bin for $6. The cheapest souveneir on the island, unless you count the seashells.
The yellow roses on the porch are straining in the wind and storm clouds are gathering, which might mean that my fisherman will be home sooner rather than later.
I'm stealing a moment from this very moment, to talk to you, dear readers. I may not get through my Father's Day menu if I don't borrow a little from this very moment. Today is cheddar cheese spread for sourdough bread. Mix it up, spread it on some sourdough bread, broil it and you'll be in cheesy bread heaven. The spread is also divine on baked potatoes, except to be honest, I seldom have any extra because I am overly smitten with the bread. But since you are less greedy and more prudent than I am, pop a couple of baked potatoes in the oven to savor with cheese spread. Mmm... Life is good. Hope you are all enjoying this very moment, wherever you are.
Money Saving Tips: When Tillamook cheddar cheese is on sale , I buy a couple loaves. (Albertson's regularly has it for $5 for 2 lbs.) It's the best for this spread, but any cheddar will work well. Swap the sourdough bread with any sturdy variety.
Cheddar Cheese Spread
Estimated Cost: $4.00
1 cup butter, softened
2 cups finely shredded cheddar cheese
1/2 teaspoon garlic powder
1 teaspoon worcestershire sauce
1 teaspoon paprika
1/4 teaspoon tabasco
1/2 teaspoon black pepper
Combine all ingredients and beat until fluffy. Use for baked potatoes or spread generously on sourdough bread and broil until melted and bubbly. This will keep for one week in the fridge.
Up Next:
Honey and Ginger Ribs for Father's Day

Monday, June 8, 2009

Honey Whole Wheat Bread

I mentioned that I spent a day at Girl's Camp at Zion's National Park this week. Somehow I managed to arrive just late enough to miss the five mile hike, which I regret since I could use a good, cleansing trudge up a mountain. But perhaps it was fortuitous; the five mile hike, as it turns out was a five miles UP kind of hike followed by a five miles DOWN kind of hike, with steep cliffs, sharp switchbacks, and oodles of strenuous teenage exertion. The poor girls hiked all day on apples and fruit snacks, since it was assumed that a piddly five mile hike that started at 7:30 AM would land them back in time for lunch. (Lunch didn't happen until 4.) Even though most of the girls were bone-tired, we moved forward with the evening's activities: rapelling, hot-tubbing, card games, bonfire testimony meeting, and snipe hunting. I'd forgotten how fun girl's camp is, even now, at thirty something. Especially at night, after the bearing of souls and secrets, when everyone is sitting around nibbling on hot tamales and plotting a little mayhem. It took me right back to the good ol' days of girl's camp with my own gang of buddies (Heidi, Tricia, Julie, Carry, and my sister Michelle.) Our favorite form of harmless torture we called "measuring for coffins," a rite of passage for the newest camp members, girls and leaders alike. The unsuspecting victim would somberly enter the cabin, where we would perform a mock measuring ritual with an old measuring tape. For the last measurement, the leg seam, the victim would have to lie down and put their leg into the air, at which point we would pour a cup of mountain-cold water right down into their pant leg. I was always amazed at how much one little cup of water could thoroughly soak the unsuspecting girl. It's a pretty harmless prank, with no lasting consequences. (Michelle and I actually performed the ceremony on her future mother-in-law; who knew?) Most people were pretty good sports about the whole affair, and after the initiation process would go on to become certified coffin measurers themselves. But one girl would have nothing to do with it and ran out of the cabin in a bit of a terror. I don't remember it at all, but later it would come back to bite me. Years later, after returning from a mission in South America, I moved into a college apartment with my little sister Heidi and some of her younger-than-me-by-a-couple-of-years friends. And one was this girl, Michal, who promptly became one of my best friends for life, after she realized that I was completely harmless and only measure for coffins as a side hobby at girl's camp. Who knew that the little frightened twelve year old would later be the kind and clever friend that completed crossword puzzles obsessively with me, would run into the November night to jump in the first snowstorm of the season, would make me die of laughter by dancing with a gigantic Mexican sombrero on her head, would stay up all night talking and listening away? Even though we are miles apart, Michal keeps a blog so I can still enjoy her wise and hilarious musings on life, motherhood (due with baby #5 in a few weeks), and this fantastic whole wheat bread. It's an amazing recipe, one that I could easily make on a weekly basis, especially considering that we (including visiting cousins) managed to polish off all four loaves in about a day. I wish I could make the bread with Michal, or at least watch her dance around in her sombrero someday soon, or at the very least.... finally get her measured for her coffin. Who knows, maybe our charges will end up at camp together some day, and the next generation can finish the job.
Money Saving Tips: Grind your own wheat for the best deal. Even if have to buy whole wheat flour, this will still be a lot cheaper than buying four loaves of fresh bakery whole wheat bread. My favorite whole wheat brands are King Arthur and Prarie Gold.
Michal's Mom's Whole Wheat Bread
Estimated Cost: $5.00 for four loaves
3 cups warm water
1/2 cup vegetable or canola oil
1/2 cup honey
scant Tablespoon coarse kosher salt or 1/2 t. fine salt
6 cups whole wheat flour
Mix ingredients in a stand mixer with a dough hook for 3 minutes. Meanwhile, proof the yeast:
3/4 cup very warm water
3 Tablespoons yeast
1/2 teaspoon sugar
1/2 teaspoon ground ginger
When yeast is proofed, add to bread mixture along with:
2 cups whole wheat flour
2 cups white, all-purpose flourMix on low or medium to incorporate, then on high for 10 minutes, or until dough is smooth and elastic.Turn out into bowl sprayed with cooking spray and allow to rise in a warm place for 25 minutes. Turn dough out onto a very lightly floured surface and separate into four loaves. Shape loaves and place in greased loaf pans. Allow to rise for 25 minutes more.Bake in 350 oven for 25-30 minutes, until bread is golden brown. Remove from oven and from pans immediately. Rub or brush tops of the loaves with butter. Allow to cool on wire cooling rack. Freeze what you're not going to use today or tomorrow.
Coming Tuesday:
Raspberry Parisian Tarts

Tuesday, April 21, 2009

Chocolate Bread Pudding with White Chocolate Sauce

Hooray for Tuesdays, the designated day of my weekly baking club. This week we made chocolate bread pudding. Mmm. Someone at my house told me they didn't like bread pudding, and maybe it was true yesterday. But today is Tuesday and people change their desserty dislikes on Tuesdays as often as April rainstorms give way to sunshine. We have Dorie Greenspan to thank for that. It's becoming quite evident that I like just about every recipe that she creates. Chocolate Bread Pudding included. Incidentally, there's so much potential in a humble piece of bread. I've gotten into the habit of saving spare slices in one communal zip top bag in the freezer. Later, the aged slices make appearances as croutons, crumbs, soup thickeners, garlic bread, stratas, and now bread pudding. Keep this one in mind when you've got a good store of leftover white. For the real recipe, click here.
I made a 1/4 batch in a loaf pan with leftover bread for about $2.00. The sauce was made in the micro with some warmed cream and white chocolate.
Have a wonderful Tuesday. Thanks to my readers who kindly requested that I live up to my word and run my carrot cake recipe. Thanks for keeping me honest!
Next Up:
Buttermilk Glazed Carrot Cake with Cream Cheese Icing

Friday, February 20, 2009

Farm-Country Multi Grain Bread

Maybe it's because I spent last week in Grandpa Bud's farm country, with nothing but peacefully frozen fields to rest the eye upon. Maybe it's because my stock of groceries was pitifully low when I came home, and short of starvation, I just can't make myself shop until the suitcases are unpacked. Maybe it's because our long drive read-aloud was Laura Ingalls Wilder's "The Long Winter," in which the Ingalls family survived a season of Dakota blizzards on loaf after loaf of wheat bread. Maybe it's because the making and kneading of bread is calming, steadying and even nostalgic. And maybe for all of these things it was important to bake bread today. A good, hearty, honest loaf of multi grain bread. The first loaf won't last long, of course, but will be gobbled up warm with slathers of creamy butter, jam, and honey. But the second loaf has potential for a truly memorable bacon, lettuce and tomato sandwich. And if I can ever get those suitcases unpacked and make it to the grocery store, that's what we'll be having for dinner. But if not, we'll read books by the fireplace, pretend we're the Ingalls family and eat some more buttered bread on this long winter night.
Money Saving Tips:
A hearty loaf of homemade bread is pretty inexpensive to make, but make sure you invest in good quality yeast. My favorite is SAF, but if it's unavailable in your area, ask your local bakery which yeast they use. They may even let you buy some of theirs. (That's how I started using SAF.) Whatever yeast you use, be sure that the liquids in the recipe are only BABY BOTTLE WARM-NOT HOT. If you ever happen to make a loaf of bread that doesn't rise, you can proof some more yeast in a bowl, mix it into the unrisen bread dough and give it another chance.
Farm Country Multi Grain Loaves
Adapted from Joy of Cooking
Estimated Cost: $3.50 for two loaves
2 cups milk
1 cup old fashioned oats
2/3 cup brown sugar
5 tablespoons butter
2 teaspoons salt
2 tablespoons active dry yeast
2 eggs
1/2 cup wheat germ (or substitute whole wheat flour)
3 cups whole wheat flour
3 cups all purpose flour, plus more if needed
extra butter
Heat milk in microwave until just boiling. Pour into free standing mixer bowl (or into large bowl to mix and knead by hand). Add oatmeal, sugar, butter, and salt. Mix well and cool to luke warm, about 15 minutes. Add yeast, eggs, wheat germ and whole wheat flour. With mixer on low, add in remaining all purpose flour. Knead on medium for 6 minutes. If dough is still sticky, add 1 tablespoon of flour at a time until dough pulls away from edges of bowl. Shape dough into large ball and using your hands, rub the outside of the dough with butter. Put the dough back into the bowl and cover with plastic wrap. Let rise until doubled, about 1 and 1/2 hours. Shape dough into two loaves and place in two nine inch loaf pans. Let rise again, covered with plastic wrap, until doubled, about 1 hour. Preheat the oven to 350 degrees. Bake about 1 hour.
Thanks for all of your kind comments of late, dear readers! I wish I could drop a loaf of bread on your front doorsteps.
Next Up:
Sunday Afternoon Juicy Roast Beef with Potatoes and Carrots

Thursday, January 22, 2009

Good For You Creamy Tomato Soup with Rosemary Focaccia

Hey-Hello everybody, and welcome to any newcomers!
Someone once tried to tell me that soup wasn't dinner. (I don't want to name names, but he's five years old, keeps rocks in his pockets, owns five light sabers, has big brown eyes and lives at my house.) To him I say, have two bowls. Maybe even three. And with soup as good for you as this one, you could probably get away with four. And who's counting, anyway? Darn it, it's January and we're all counting. Counting calories, counting pennies, counting minutes. Fortunately, this soup measures low on all of the aforementioned categories, with an exceptionally high rating in taste. I know, because I'm the judge. (In fact I'm all three judges and I give it three tens.) As for calories, it's good and low since you are swapping out the heavy cream that usually makes soup so luxurious. Instead, you've got three options below: evaporated skim milk, low fat cream cheese, or fat free half and half. As for pennies, this soup is particulary easy on the pocket book, since you're using canned tomatoes (stock up during sales!), humble vegetables, and pantry staples for seasonings. And as for minutes, head directly to the kitchen because you could be having soup in about 25 of them. As an added bonus, I've included my recipe for rosemary focaccia. With this rustic flatbread baking in the oven and tomato soup simmering on the stove, the whole house will smell like an Italian villa. And even five year old little charges will be won over by such savory charms and be forced to admit that dinner, yes-this soup dinner, is down right delicious. (By the way, he had three bowls.) But who's counting?
Money and Time Saving Tips:
Keep the pantry stocked with canned tomatoes for fast dinners. I buy cases of tomatoes when they go for 50 cents a can. Use stock, broth or even bouillion cubes, depending on what you've got. You can also make the soup creamy with regular milk, but it may not be as luxurious. For the focaccia, use dried rosemary or swap it out for dried basil. But wedges of parmesan when on sale; they keep well. Baking your own bread, especially specialty bread, will save you oodles over bakery prices. If you're pressed for time, you can use purchased pizza dough or a roll of Pillsbury french bread.
Good for you Creamy Tomato Soup
Estimated Cost: $5.50 for four servings
1 tablespoon olive oil
1 onion, chopped
2 carrots, peeled and chopped
3 cloves garlic, chopped
2 (14 ounce) cans Italian style diced tomatoes, undrained
2 cups chicken broth or stock
pinch of red pepper flakes
1 teaspoon balsamic or red wine vinegar
1 teaspoon honey
3/4 cup evaporated skim milk, or 4 ounces 1/3 less fat cream cheese
chopped fresh basil or parsley for serving
In a large pot, heat oil over medium high heat. Add oniion and carrots and saute for five minutes. Stir in garlic and saute an additional minute. Add tomatoes, broth, red pepper flakes, vinegar, and honey. Season to taste with salt and pepper. Bring to a boil; cover, reduce heat to medium and simmer for 20 minutes, or until all vegetables are tender. For a creamy soup, transfer to blender and blend, or use an immersion blender directly in the pot. (Immersion blenders are a must have for soup lovers!) Soup can be made up to 2 days ahead of time to this point. Just before serving, add evaporated skim milk (or cream cheese of half and half) to pot. Warm through, but do not boil. Serve immediately with basil or parsley, and hopefully some warm focaccia. Rosemary Focaccia
Estimated Cost: $3.50 for 12 wedges
Notes: My favorite yeast is SAF, which many professional bakeries use. It may not be available at your store, so ask your supermarket baker which yeast they use behind the counter and buy that one. If you get a truly reliable yeast, and you make sure your water isn't too hot, you almost can't fail.
2 teaspoons rapid rise yeast
1 teaspoon sugar
1 cup plus 2 tablespoons warm water (think baby bottle warm)
1 tablespoon olive oil
1/2 teaspoon black pepper
1 teaspoon salt
1 teaspoon dried rosemary, chopped, or 1 tablespoon fresh
3 cups flour (I use half whole wheat)
For Top:
2-6 tablespoons olive oil
1/4 cup to 3/4 cup parmesan cheese
additional chopped dried or fresh rosemary
black pepper
In a large bowl, combine yeast, sugar, water, olive oil, pepper, salt, rosemary and half of the flour. Stir with a wooden spoon. (Alternately, if you have a free standing mixer, put in all of the flour and let the machine do the work.) Work in the remaining flour, using your hands and kneading when necessary. Knead dough for five minutes. Cover and let rise for one hour. (The dough can be made up to 24 hours in advance. Cover with saran wrap and store in fridge.) Preheat oven to 425 degrees. Press dough into a 12 inch circle. Don't worry about being perfect; you're going for rustic Italian here. Press the dough all over with your fingertips to make indentations. Cover dough with olive oil, cheese, rosemary and black pepper. Bake for about 15-20 minutes, or until puffed and golden brown. Cut into wedges and serve. Any leftovers make a killer sandwich for the next day.
Up Next: My New Favorite Dinner
20 minute Toasted Walnut and Garlic Pasta
plus a burning question....

Sunday, August 31, 2008

Whole Wheat Hamburger Buns

A couple of months ago, I got a vintage copy of Prudence Penny's Cookbook in the mail. I had never heard of Prudence Penny, but apparently she was a Los Angeles Times food writer who encouraged young housewives to make appealing meals on a budget. The cookbook came to me from Deb in Hawaii, who has a gorgeous blog with stunning recipes and tidbits about life in paradise. Deb had been at a flea market and had noticed the book and immediately bought it and shipped it to me, wrapped in beautiful paper, and complete with beach themed note card.
It's readers like Deb that make being Prudence Penny (the only difference is that I have added WISE to my moniker) number 2 worthwhile. So many of you have brightened my day, made my recipes, encouraged my random ramblings, gently corrected any of my errors, and essentially made the hours of blogging worthwhile for me. Thank you, friends and readers.
This week I posted a hamburger bun recipe, white and buttery, the way that I usually make the, even though I'm almost exclusively a freakish whole grain lover. Deb, of Hawaiian fame, asked about making the buns with whole wheat. Although I was pretty darn sure they would work just fine, I wanted to test them out because I would never want to lead dear Deb astray. Plus, all of us have tasted hard and dry wheat rolls, and I wanted my buns to be hearty, but also light and tender. Ding, ding, ding! Success! I altered the original recipe only very slightly and now I've got a new favorite. Goodbye white buns (although Quiet Man still likes those best) and hello Wheaty Better for You Buns. Make them both and let me know which one you like best. This one's for you, Deb!
Money Saving Tips: Wheat is getting pricey, so buy your ground whole wheat on sale, or grind your wheat kernels if you can. Consider buying in bulk to save money.

Whole Wheat Hamburger Buns

Estimated Cost: $2.50 for 10

Notes: These are good enough to eat on their own, or with a bit of butter and jam.

1 cup milk

2 tablespoons butter, plus more for bowl

2 and 1/4 teaspoons yeast (Use SAF yeast if you can)

3 tablespoons brown sugar

1 and 1/4 teaspoon salt

2 eggs, divided use

2 and 1/4 cups whole wheat flour

1 cup all purpose flour

wheat germ, for sprinkling the outsides

In a small microwave safe bowl, heat butter and milk until butter melts. Cool until warm (about 95-105 degrees), about five minutes. In a large bowl, combine butter mixture, yeast, brown sugar, salt and 1 egg and 1 egg white. Stir in flour, 1 cup at a time to form a slightly sticky dough. Knead for 3 minutes; shape into a bowl. Butter the bowl and replace dough. Let rise until doubled, about 1 hour. Shape into 10 rolls and place on buttered cookie sheet. Let rise, covered, for about 50 minutes or until light and large. Lightly brush with remaining egg yolk and sprinkle with wheat germ. Bake at 450 degrees for about 15 minutes.

White Rolls after Rising and Baking:

Coming First Light of Tuesday:

Tuesdays with Dorie:

Peanut Butter and Chocolate Oatmeal Bars

Wednesday, August 27, 2008

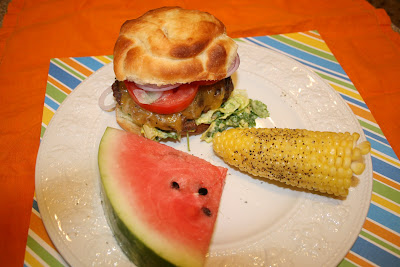
Classic Cheeseburgers on Homemade Buns

If you truly want a rest from your labors this Labor Day, then plan ahead for a big and easy burger cook out. I've got three scrumptious burgers to share with you this week: a classic and juicy beef cheeseburger, a tomatillo turkey burger with a creamy avocado sauce, and a brown rice and black bean vegetarian patty with zingy southwest veggies. Make all three for a big burger bash, or choose one for a small get together. I won't be able to help you choose which one; so help me, I love them all. Whichever one you choose, be sure to make these homemade hamburger buns for an over the top burger experience. (I'll post some whole wheat hamburger buns later in the week, per the request of my favorite Hawaiian blogger Deb.)
Sample Labor Day Menu:
Grilled Burgers on Homemade Buns
Gourmet Kettle Chips (I'm addicted to the Spicy Thai-try um!)
corn on the cob
veggies and dip
watemelon
Ice Cream Torte (scroll down to yesterday's post for recipes)
Money Saving Tips: Every grocery store in town is going to have ground meat, condiments, chips and ice cream on sale for Labor Day. Take advantage and stock up. If the meat is a really good deal, buy a big package, portion it up at home, and freeze it for another day.
Classic Cheeseburgers
Estimated Cost: $8.00 for four
Notes: I make a condiment rich crunchy lettuce salad for these burgers, and then I skip condiments on the bun.
1 and 1/3 pound ground beef (not too lean)
1 egg
1 teaspoon minced garlic, or 1/2 teaspoon garlic powder
1 tablespoon Worcestershire sauce
1 teaspoon ground black pepper
1/2 teaspoon salt
sliced cheese, (sharp cheddar or swiss work best)
3 cups chopped romaine lettuce
1/3 cup mayonnaise
3 tablespoons yellow mustard
sliced tomatoes,
sliced dill pickles
sliced red onion

In a medium bowl, lightly combine meat, egg, garlic, Worcestershire, pepper, and salt. Shape into patties. (Patties can be covered and refrigerated for up to 24 hours, if desired.) Preheat grill for medium hot cooking. Grill patties about four minutes per side, topping with cheese for last minute of cooking. Let rest, covered, for five minutes, to finish cooking from residual heat. Meanwhile, combine lettuce, mayonnaise and mustard in a medium bowl; season to taste with salt and pepper. To make burgers, layer lettuce mixture, patty, tomato, pickle and onion on bottom buns. Cover with top buns and serve.


Homemade Hamburger Buns
Estimated Cost: $2.00 for 10
Notes: These buns will take your burger from so-so to unforgettable. Make them a couple days ahead and freeze them, or bake them up fresh. Use all purpose flour for a soft rich bun.
1 cup milk plus 1 tablespoon, divided
1/4 cup sugar
2 tablespoons butter, plus more for buttering bowl
1 teaspoon salt
1 egg, yolk and white divided
2 and 1/4 teaspoon yeast (I use SAF)
3 cups flour

In a microwave safe small bowl, combine 1 cup milk, sugar and butter. Heat until butter just melts and mixture is warm but not hot. If it is hot, wait until it is lukewarm to proceed. In a large bowl, combine salt, egg white, yeast, and flour-one cup at a time, to form a soft dough. (In a separate small bowl, combine remaining egg yolk and tablespoon of milk). Knead dough briefly, about three minutes. Butter same bowl, replace dough, cover and let rise for about 1 hour, or until doubled. (At this point, you could punch the dough down and refrigerate it for up to 24 hours, or until ready to proceed.) Shape dough into 10 separate round buns. You can roll them out and cut them with a biscuit cutter, or you can simply shape them into 10 round buns. Let rise on a greased baking sheet for about 45 minutes, or until light and risen. Preheat oven to 450 degrees. Brush buns with egg yolk mixture. Bake for about 15-18 minutes, or until nicely browned. Coming Tomorrow:
A Brief Break from Burgers for Barefoot Thursdays
Grilled Lemon and Rosemary Chicken Tenders and a Bonus